
How to Use a Sewing Machine: A Beginner’s Step-by-Step Guide
Welcome to the wonderful world of sewing! At first glance, a sewing machine can look like a complex and intimidating piece of equipment with all its dials, levers, and moving parts. But don’t worry—once you understand the fundamental components and their purpose, you’ll see it’s a remarkably user-friendly tool designed to make creation easy. This comprehensive 8000+ word guide will take you from complete beginner to confident sewer, covering everything from basic setup to advanced techniques.
As experienced sewing educators with over 20 years of teaching experience, we know that getting started is the hardest part. This guide is designed to be your friendly first lesson and ongoing reference. We will walk you through setting up your machine, threading it correctly, sewing your very first stitch, and progressing to more advanced projects. By the end, you’ll have the confidence to tackle anything from simple repairs to creating custom garments.
Before You Begin: Every sewing machine is slightly different. While we cover universal principles, always keep your machine’s manual nearby. It’s your best resource for model-specific instructions and diagrams.
Step 1: Getting to Know Your Machine – The Essential Parts
Before you can sew, you need to know the names and functions of a few key parts. Grab your machine’s manual to see what these look like on your specific model. Understanding these components is crucial for troubleshooting and achieving professional results.
Core Components Every Beginner Must Know
- Handwheel: The large wheel on the right side of the machine. It allows you to move the needle up and down manually. Rule #1: Always turn it towards you. This wheel gives you precise control when starting or ending seams.
- Spool Pin: The post that holds your spool of thread. Some machines have horizontal spool pins, while others have vertical ones. Some advanced models even have two spool pins for twin needle sewing.
- Thread Guides: The series of hooks, channels, and levers that your top thread will follow on its path to the needle. Modern machines typically have numbered guides (1, 2, 3, etc.) to make threading foolproof.
- Tension Dial: This numbered dial controls how tight the top thread is. The tension works in conjunction with the bobbin tension to create a perfect lockstitch. For now, you can leave it on the standard setting (usually marked or set to “4”).
- Take-Up Lever: This is the metal arm that moves up and down as you sew. Its most important job is to pull the thread tight after each stitch to form a perfect lockstitch. It’s usually the highest point in your threading path.
- Needle & Needle Clamp: The needle clamp is a small screw that holds the needle in place. Needles come in different types and sizes for different fabrics. We’ll cover needle selection in detail later.
- Presser Foot: The small, ski-shaped foot that holds your fabric down flat against the machine as you sew. It is raised and lowered by a lever behind the needle area. Different presser feet are available for different techniques.
- Needle Plate: The metal plate directly under the needle. It has lines etched into it that serve as seam allowance guides. Some plates have markings for 1/4″, 3/8″, 5/8″, and other common seam allowances.
- Feed Dogs: The little metal teeth under the presser foot that grip your fabric and move it forward (or backward when using reverse). They work in conjunction with the presser foot to control fabric movement.
- Bobbin, Bobbin Case, and Cover: The bobbin is the small spool that holds the bottom thread. It sits inside the bobbin case under the needle plate. Top-loading bobbins are easiest for beginners.
- Foot Pedal: This is the “gas pedal” for your machine. The harder you press, the faster it sews. Some machines also have speed control settings.
- Stitch Selector: Allows you to choose different stitch patterns (straight stitch, zigzag, decorative stitches).
- Stitch Length & Width Controls: Adjust these to make stitches longer/shorter or wider/narrower depending on your fabric and project needs.

Needle and presser foot area

Tension dial and stitch controls

Thread path and spool pin
Step 2: Winding the Bobbin – Complete Guide
Your machine needs two threads to make a stitch: a top thread from the spool and a bottom thread from the bobbin. Your first task is to fill the bobbin correctly. An improperly wound bobbin can cause countless sewing problems.
Detailed Bobbin Winding Process
- Select the Right Bobbin: Use only bobbins recommended for your specific machine model. Using the wrong bobbin can cause tension problems and jamming.
- Prepare Your Thread: Place your spool of thread on the spool pin. Make sure it unwinds in the direction indicated in your manual (usually counter-clockwise for most spools).
- Thread the Bobbin Winder: Follow the bobbin winding thread path. Your machine will have a diagram (usually a dotted line) showing how to loop the thread around a small tension disc specifically for bobbin winding. This tension is separate from your main tension dial.
- Secure the Thread: Poke the end of the thread through the small hole in the top of the empty bobbin. Hold onto this thread tail or give it a gentle tug to secure it. Some bobbins have multiple holes for different thread types.
- Engage the Bobbin Winder: Place the bobbin onto the bobbin winder spindle (a small post on top of the machine) and push it to the side. This action will disengage the needle mechanism so it doesn’t move while you wind. You should hear or feel a click when it’s properly engaged.
- Start Winding Slowly: Gently press the foot pedal. After the bobbin has wound a few layers, stop and snip the thread tail close to the hole. This prevents the tail from getting caught in subsequent layers.
- Monitor the Fill: Continue winding until the bobbin is about 80-90% full. The thread should be below the rim of the bobbin. Overfilling can cause the bobbin to jam in its case.
- Finish Properly: Cut the thread, and slide the winder spindle back to its original position. Remove the bobbin. You should have a neatly wound bobbin with thread coming off smoothly.
Pro Tip: Wind several bobbins at once when starting a big project. This saves time and ensures consistency throughout your project. Label bobbins with the thread color and type using a small piece of masking tape.
Bobbin Winding Troubleshooting
| Problem | Cause | Solution |
|---|---|---|
| Bobbin winds unevenly | Thread not properly seated in tension disc | Re-thread the bobbin winder path, ensuring thread is in the tension disc |
| Bobbin won’t wind at all | Bobbin winder not engaged | Push bobbin winder spindle fully to engaged position |
| Thread keeps breaking during winding | Too much tension or damaged thread | Check for snags, use fresh thread, clean tension disc |
| Bobbin overflows | Automatic stop not functioning | Watch filling and stop manually at 90% full |

1. Complete Sewing Starter Kit
To get started, you’ll need more than just the machine. This type of kit provides all the essential notions in one package: a variety of threads, a measuring tape, a seam ripper for fixing mistakes, sharp thread snips, and a pincushion. It’s the perfect companion to a new machine.
Why it’s essential: Having all your basic tools in one organized set prevents frustration and ensures you have what you need when you need it. The included threads are perfect for practice and initial projects.
Check Price on AmazonStep 3: Threading the Machine (Top and Bottom)
This is the step that intimidates beginners the most, but modern machines make it easy with numbered guides. Proper threading is critical for good stitch formation. Let’s break it down into manageable steps.
The Most Important Tip for Threading: Before you begin, use the handwheel to raise the needle to its absolute highest point and, crucially, **make sure the presser foot is lifted UP.** This opens the tension discs inside the machine, allowing the thread to seat correctly. If you thread with the presser foot down, the thread won’t seat in the tension discs, resulting in loose, loopy stitches.
Threading the Top Thread – Detailed Guide
Most machines have numbers or arrows showing the threading path. Here’s the universal process:
- Raise the Needle: Turn the handwheel toward you until the needle is at its highest position.
- Lift the Presser Foot: Raise the presser foot lever to open the tension discs.
- Place the Spool: Put your thread spool on the spool pin. If it’s a vertical pin, some spools need a spool cap to prevent tangling.
- Follow the Path: Guide the thread through each numbered guide:
- From spool to first guide (usually at the top back of the machine)
- Down to the tension dial area
- Around or through the tension discs (this is automatic if you’re following the path)
- Up to the take-up lever (thread through the hole or around the lever)
- Down to the needle area
- Thread the Needle: Most modern machines have a built-in needle threader. To use it:
- Lower the needle threader lever
- Guide the hook through the needle eye
- Pull the thread through the hook
- Release the lever to pull the thread through the needle
- Pull Thread Through: Pull about 5-6 inches of thread through the needle. This gives you enough thread to start sewing and bring up the bobbin thread.
Loading the Bobbin (Bottom Thread)
There are two main bobbin systems: top-loading (drop-in) and front-loading. Most beginner machines use top-loading bobbins, which are easier to use.
For Top-Loading Bobbins:
- Open the bobbin cover (usually a hinged or sliding plate near the needle plate).
- Hold the bobbin so the thread unwinds in the correct direction (usually counter-clockwise – check your manual).
- Drop the bobbin into the case. It should sit flat and spin freely when you pull the thread.
- Pull the thread through the slot or notch in the bobbin case. There’s usually a small tension spring here.
- Pull about 3-4 inches of thread out and close the cover.
For Front-Loading Bobbins:
- Remove the bobbin case from the machine (it usually clicks out).
- Insert the bobbin into the case, following the direction arrows.
- Pull the thread through the slot in the case and under the tension spring.
- Hold the bobbin case by the latch and insert it back into the machine until it clicks.
- Pull the thread gently; you should feel slight tension from the spring.
Bringing Up the Bobbin Thread
This magical step joins your top and bottom threads:
- Gently hold the top thread tail with your left hand.
- With your right hand, turn the handwheel towards you one full rotation.
- The needle will go down into the machine, catch the bobbin thread, and come back up.
- You’ll see a loop of bobbin thread come up through the needle plate.
- Use a small pair of scissors, a seam ripper, or your fingers to pull this loop all the way through.
- You should now have two thread tails—one from the needle and one from the bobbin.
- Slide both threads under the presser foot and toward the back of the machine.
Common Threading Mistakes to Avoid:
- Threading with presser foot down (causes tension issues)
- Skipping a thread guide
- Not getting thread properly into take-up lever
- Bobbin thread unwinding in wrong direction
- Not pulling enough thread through before starting
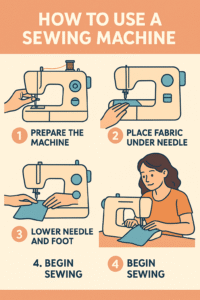
Step 4: Let’s Sew! Your First Straight Seam
Congratulations, the hard part is over! Now for the fun. A straight seam is the foundation of all sewing. Mastering this will give you confidence for all future projects.
Preparing Your Practice Fabric
Start with medium-weight cotton fabric. It’s stable, easy to handle, and forgiving. Avoid stretchy fabrics, silk, or denim for your first attempts.
- Cut Your Fabric: Cut two rectangles about 8×10 inches. This gives you plenty of room to practice.
- Press if Needed: If your fabric is wrinkled, press it with an iron. Smooth fabric is easier to sew accurately.
- Pin if Desired: You can pin the layers together along the edge you’ll be sewing. Place pins perpendicular to the seam line, about 2-3 inches apart.
The Sewing Process Step-by-Step
- Set Your Machine:
- Stitch selector: Straight stitch
- Stitch length: 2.5-3.0 mm (medium length)
- Tension: 4 (or manufacturer’s recommendation)
- Needle position: Center (if adjustable)
- Position the Fabric: Lift the presser foot lever. Slide your fabric under the presser foot and line up the right edge with a seam guide on the needle plate. The 5/8″ (1.5cm) line is standard for garment sewing. Lower the presser foot to hold the fabric in place.
- Lower the Needle: Turn the handwheel toward you to lower the needle into the fabric, about 1/2 inch from the edge. This anchors your starting point.
- Start Sewing: Gently press your foot on the foot pedal. Start slowly! Use your hands to gently guide the fabric, keeping the edge aligned with your chosen seam guide. Do not push or pull the fabric; let the feed dogs do all the work. Your hands should simply guide and steer.
- Backstitch to Lock the Seam: After sewing about half an inch, press and hold the reverse lever/button on your machine. Sew backward for 2-3 stitches right on top of your existing stitches, then release the lever and continue sewing forward. Do this again at the very end of your seam. This locks the stitches in place so they don’t unravel.
- Maintain Consistent Speed: Try to maintain a steady, medium speed. Jerky movements can cause uneven stitches. If you need to stop, simply take your foot off the pedal.
- Finish the Seam: Once you reach the end, stop, backstitch, and then turn the handwheel to raise the needle to its highest position. Lift the presser foot, pull the fabric out toward the back, and snip the threads, leaving a 2-3 inch tail.
Guiding Technique: Place your hands on either side of the presser foot, not directly in front. Use your left hand to guide the fabric and keep it aligned with the seam guide. Use your right hand to gently support and steer the fabric as it feeds through.
Assessing Your First Seam
Examine your practice seam:
- Top and bottom: The stitches should look identical on both sides.
- Tension: No loops or puckering.
- Straightness: The seam should be parallel to the fabric edge.
- Consistency: Stitches should be evenly spaced.

2. Dedicated Fabric Shears
One of the first rules of sewing is to never use your fabric scissors on paper. A good pair of 8-inch dressmaker’s shears will make cutting patterns a joy. They are engineered to cut cleanly through fabric without snagging, which is essential for a professional result.
Key features to look for: Bent handles for cutting on flat surfaces, adjustable tension screw, comfortable grips, and high-quality stainless steel blades that stay sharp through extensive use.
Check Price on AmazonStep 5: Mastering Basic Stitches
Once you’ve mastered the straight stitch, it’s time to explore your machine’s other capabilities. Most modern machines offer several basic stitches that expand your creative possibilities.
The Essential Stitches Every Beginner Should Know
| Stitch Type | Common Uses | Recommended Settings | Tips |
|---|---|---|---|
| Straight Stitch | Basic seams, topstitching, basting | Length: 2.0-3.0mm Width: 0mm |
Adjust length shorter for finer fabrics, longer for basting |
| Zigzag Stitch | Finishing raw edges, sewing stretch fabrics, appliqué | Length: 2.0-3.0mm Width: 3.0-5.0mm |
Use wider zigzag for stretch fabrics, narrower for edge finishing |
| Buttonhole Stitch | Creating buttonholes (automatic or manual) | Use buttonhole foot Follow manual instructions |
Always practice on scrap fabric first. Stabilize with interfacing. |
| Blind Hem Stitch | Nearly invisible hems on garments | Length: 2.5-3.0mm Width: 2.0-3.0mm |
Use blind hem foot. Fold fabric precisely as manual instructs. |
| Overlock/Serger Simulation | Finishing seams to prevent fraying | Special stitch on some machines | Use with zigzag or overcast foot. Sew close to fabric edge. |
| Basting Stitch | Temporary seams for fitting | Length: 4.0-5.0mm | Longest straight stitch. Easy to remove later. |
Practice Exercise: Creating a Simple Project
Let’s create a practical item to practice multiple skills:
Simple Reusable Produce Bag
- Materials: 1/2 yard of lightweight cotton or mesh fabric, matching thread
- Cutting: Cut two rectangles 15″ x 18″
- Seams:
- Place fabric right sides together
- Sew side seams using straight stitch (5/8″ seam allowance)
- Finish raw edges with zigzag stitch
- Bottom: Box the bottom corners (cut small squares, sew together)
- Top Hem: Fold top edge 1/4″, then 1″ and stitch to create casing
- Drawstring: Insert cord or ribbon
This project practices: straight seams, seam finishing, hems, and following measurements.
Step 6: Understanding Fabric and Needle Selection
Choosing the right needle and understanding fabric properties are crucial for successful sewing. Using the wrong needle can cause skipped stitches, fabric damage, or thread breakage.
Needle Types and Sizes
| Needle Type | Best For | Size Range | Special Features |
|---|---|---|---|
| Universal | Most woven fabrics (cotton, linen, polyester blends) | 70/10 – 100/16 | Slightly rounded point. Good general-purpose needle. |
| Ballpoint/Jersey | Knit fabrics (t-shirts, jersey, sweatpants) | 70/10 – 100/16 | Rounded tip slides between knit fibers without piercing |
| Sharp/Microtex | Fine woven fabrics (silk, microfiber, lightweight synthetics) | 60/8 – 90/14 | Very sharp point for precise stitching |
| Denim/Jeans | Heavy fabrics (denim, canvas, upholstery) | 90/14 – 110/18 | Strong shaft, sharp point to penetrate dense fabrics |
| Leather | Leather, faux leather, vinyl | 80/12 – 110/18 | Chisel point cuts through leather without tearing |
| Topstitching | Decorative topstitching, heavy threads | 80/12 – 100/16 | Large eye and groove for thicker threads |
| Twin/Double | Decorative stitching, pintucks, hemming | Various | Two needles on one shaft for parallel rows of stitching |
Fabric Characteristics
Understanding fabric behavior will help you sew successfully:
- Woven Fabrics: Have lengthwise (warp) and crosswise (weft) threads. Generally stable and easy to sew. Examples: cotton, linen, denim, silk.
- Knit Fabrics: Made from interlocking loops. Stretchy and require special techniques. Examples: jersey, interlock, rib knit, sweater knits.
- Fabric Weight: Lightweight (chiffon, voile), medium-weight (quilting cotton, linen), heavyweight (denim, canvas).
- Fabric Grain: Always cut pattern pieces following grain lines indicated on patterns.
- Pre-washing: Always pre-wash fabric as you will wash the finished item to prevent shrinkage later.

3. Variety Pack of Sewing Machine Needles
A comprehensive needle assortment is essential for working with different fabrics. This type of pack includes universal, ballpoint, denim, and microtex needles in various sizes. Changing needles regularly (every 8-10 hours of sewing) prevents skipped stitches and fabric damage.
Why you need it: Dull or bent needles are the most common cause of sewing problems. Having the right needle for each fabric type makes sewing easier and produces better results.
Check Price on AmazonStep 7: Troubleshooting Common Problems
Every sewer encounters problems. Learning to diagnose and fix common issues will save you frustration. Here are solutions to the most frequent beginner problems.
Tension Problems
Tension issues are the most common problem. The ideal stitch has the top and bottom threads locking in the middle of the fabric layers.
| Problem | What It Looks Like | Likely Cause | Solution |
|---|---|---|---|
| Loopy stitches on bottom | Top thread visible on underside, loose loops | Top tension too loose or bottom tension too tight | Increase top tension (higher number) or decrease bobbin tension |
| Loopy stitches on top | Bobbin thread visible on top, loose loops | Top tension too tight or bottom tension too loose | Decrease top tension (lower number) or increase bobbin tension |
| Thread breaking | Top or bottom thread keeps breaking | Tension too tight, damaged needle, rough spot in thread path | Reduce tension, change needle, check for burrs or rough spots |
| Uneven stitches | Stitches vary in length or tension | Inconsistent speed, pulling fabric, dirty machine | Practice steady speed, let feed dogs move fabric, clean machine |
| Fabric puckering | Fabric gathers along seam line | Tension too tight, wrong needle, dull needle | Reduce tension, use correct needle type/size, change needle |
Thread and Needle Issues
- Skipped Stitches: Usually caused by wrong needle type, bent needle, or incorrect needle installation. Change needle and ensure it’s fully inserted.
- Thread Bunching (Bird’s Nesting): Thread tangles under fabric. Caused by improper threading, starting without lowering presser foot, or bobbin issues. Re-thread completely, ensure presser foot is down when sewing.
- Needle Breaking: Usually from pulling fabric, hitting pins, or using wrong needle for fabric. Don’t pull fabric, remove pins before they reach needle, use correct needle.
- Machine Jamming: Stopped suddenly. Turn off, remove fabric, turn handwheel backward slightly to free mechanism, remove thread jam, re-thread.
Safety First: Always turn off and unplug your machine when:
- Changing needles
- Cleaning or oiling
- Removing jams
- When not in use
Step 8: Maintenance and Cleaning
Regular maintenance keeps your machine running smoothly and extends its life. A clean machine sews better and has fewer problems.
Daily Maintenance (After Each Use)
- Remove Lint: Use the small brush that came with your machine to clean lint from:
- Around the feed dogs
- Bobbin area
- Thread path
- Needle plate
- Change Needle: Replace needle after 8-10 hours of sewing or with each new project.
- Cover Machine: Use a dust cover to prevent dust accumulation.
Weekly/Monthly Maintenance
- Deep Clean Bobbin Area:
- Remove needle plate (consult manual)
- Remove bobbin case
- Use brush and/or vacuum attachment to remove all lint
- Wipe with dry cloth
- Oil if Required: Some machines need oiling (check manual):
- Use only sewing machine oil
- Apply tiny drops to points indicated in manual
- Sew on scrap fabric to distribute oil
- Check Belts and Motors: On older machines, check belts for wear.
Annual Professional Servicing
Even with good home maintenance, take your machine for professional servicing every 1-2 years, or if you notice:
- Unusual noises
- Persistent problems not solved by basic troubleshooting
- Electrical issues
- Stiff movement
Step 9: First Projects for Beginners
Start with simple projects that build skills gradually. Here are excellent beginner projects in order of difficulty.
Project 1: Simple Pillowcase (Skill Level: Beginner)
Skills practiced: Straight seams, French seams (optional), hems
- Materials: 1 yard of cotton fabric, matching thread
- Cutting:
- Main piece: 27″ x 42″
- Cuff piece: 9″ x 42″
- Contrast band (optional): 2″ x 42″
- Construction:
- Sew cuff to main piece (right sides together)
- Add contrast band if using
- Fold right sides together, sew side and bottom seams
- Trim corners, turn right side out
- Press and topstitch opening if desired
Project 2: Tote Bag (Skill Level: Beginner+)
Skills practiced: Straight seams, box corners, handles, topstitching
Project 3: Simple Skirt (Skill Level: Intermediate Beginner)
Skills practiced: Waistband, elastic casing, hemming, following a pattern
Project Success Tips:
- Read through all instructions before starting
- Pre-wash and press all fabric
- Cut accurately – measure twice, cut once
- Pin or clip before sewing
- Press seams as you go
- Don’t rush – accuracy is more important than speed
Step 10: Advancing Your Skills
Once you’re comfortable with basics, explore these areas to expand your sewing abilities.
Essential Advanced Techniques
- Zippers: Start with centered zippers, then try invisible zippers
- Buttonholes: Master your machine’s buttonhole function
- Curves and Corners: Practice pivoting at corners and sewing curves
- Gathering: Create ruffles and fullness
- Darts: Shape fabric to fit body contours
- Bias Tape Binding: Finish edges professionally
- Interfacing: Add structure and stability
- Topstitching: Decorative and functional stitching
Reading Patterns
Commercial patterns open up endless project possibilities:
- Choose the Right Pattern: Look for “Easy,” “Beginner,” or “1-hour” patterns initially
- Understand Pattern Envelope: Back shows fabric requirements, difficulty level, suggested fabrics
- Pattern Symbols: Learn grain lines, notches, darts, fold lines
- Cutting Layout: Follow layout diagrams for your size and fabric width
- Transfer Marks: Use tracing wheel, tailor’s chalk, or marking pens
- Follow Instructions Step-by-Step: Don’t skip steps
Conclusion: Your Sewing Journey Has Begun
You did it! You have successfully set up, threaded, and used a sewing machine to create a seam. Like any new skill, sewing is all about practice. The process of threading and handling the machine will become second nature very quickly.
Remember these key principles as you continue:
- Practice regularly – even 15 minutes a day builds skill
- Start simple – master basics before advancing
- Be patient with yourself – everyone makes mistakes
- Learn from errors – each mistake teaches you something
- Join a community – sewing groups offer support and inspiration
- Have fun! – sewing should be enjoyable
An entire world of creative possibility is now at your fingertips. From mending and alterations to creating custom clothing, home decor, and gifts, sewing is a practical and rewarding skill that will serve you for a lifetime. Your first stitches are just the beginning of a creative journey that offers endless opportunities for expression and accomplishment.
Final Encouragement: Every expert sewer was once a beginner who didn’t know how to thread a bobbin. Your progress will amaze you. In six months, you’ll look back at your first wobbly seam with affection, amazed at how far you’ve come. Keep sewing, keep learning, and most importantly, enjoy every stitch of the journey!
Frequently Asked Questions
Change your needle after every 8-10 hours of sewing, with each new project, or if you notice skipped stitches, pulling, or thread breakage. Using a fresh needle is the simplest solution to many sewing problems.
Thread breakage can be caused by: 1) Tension too tight, 2) Old or poor quality thread, 3) Damaged needle, 4) Rough spot in thread path, 5) Incorrect needle for thread weight. Check each possibility starting with changing the needle and thread.
Consistent seam allowance. Learning to sew a straight line at an exact distance from the fabric edge is foundational. Practice this until it becomes automatic before moving to complex projects.
Yes! Use a ballpoint or stretch needle, polyester or wooly nylon thread, and a narrow zigzag stitch or special stretch stitch. Don’t stretch the fabric as you sew – let the machine feed it naturally.
Look for: 1) Easy threading system, 2) Top-loading bobbin, 3) Basic stitches (straight, zigzag, buttonhole), 4) Good brand reputation, 5) Within your budget. Avoid overly complex machines as a beginner.


